REVIEW · MIAMI
Paddle Sports with Miami Watersports
Book on Viator →Operated by Miami Watersports · Bookable on Viator
Paddle time on Biscayne Bay beats being stuck on a boat. For $19 you get a kayak or paddleboard rental plus life jackets, a short safety briefing, then freedom to explore at your own pace around Key Biscayne. Two things I really like: you don’t need heavy gear, and the setting is naturally calm thanks to the bay’s shallow flats.
The one drawback to plan for is that weather can shut things down on the day. Summer rain can hit fast, and while you may be offered a way to reschedule, the experience itself is generally non-refundable, so build in flexibility.
In This Review
- Quick takeaways before you book
- Paddle Sports with Miami Watersports: a simple way to use Biscayne Bay
- Price and value: what $19 really buys
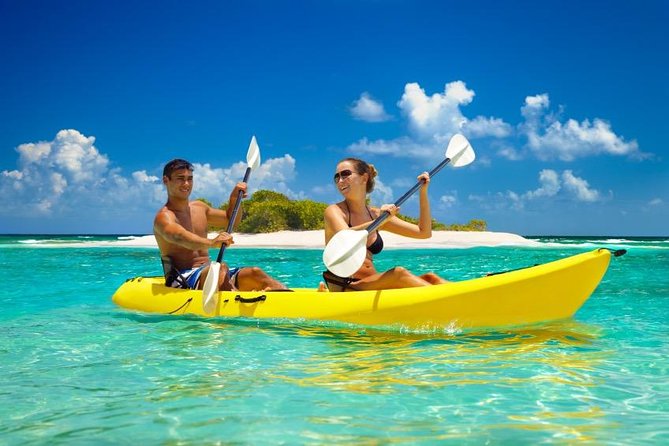
- Choosing your ride: single kayak, double kayak, or stand-up paddleboard
- Kayaks: easier stability, more control
- Paddleboards: fun, athletic, and very photo-friendly
- Where you start (Key Biscayne) and how that shapes your experience
- From safety briefing to the water: getting your bearings fast
- Paddling your own route in Biscayne Bay National Park (without getting stuck)
- What you might see along the way
- The “shore-hugging” reality
- A practical mini-itinerary for your 1-hour session
- Step 1: Check-in and paperwork
- Step 2: Fit-up and safety briefing
- Step 3: Push off and find your pace
- Step 4: Your wildlife-and-scenery plan
- Step 5: Head back with time in mind
- What it’s like in real life: group size, staff, and comfort
- What to bring and wear: don’t paddle unprepared
- Weather, rain, and how to protect your money
- Who should book this paddle time?
- Should you book Paddle Sports with Miami Watersports?
Quick takeaways before you book
- Self-guided time means no large group pacing you around.
- Kayak or paddleboard options (single/double kayaks and stand-up paddleboards).
- Biscayne Bay National Park feel with no fixed route, so you choose how far to go.
- Wildlife spotting is part of the fun, with dolphins, sea turtles, and manatees all possible.
- A small group setup (up to 10 travelers) keeps it calmer than big tours.
Paddle Sports with Miami Watersports: a simple way to use Biscayne Bay
This is one of those Miami activities that feels more like borrowing freedom than buying a complicated tour. You start at the water on Key Biscayne, get your safety instructions, then head out on your own along Biscayne Bay. There’s no strict route pinned to your group, so you can move at the speed you actually paddle—slow for photos, quick when you’re feeling confident.
You’re also paying for something that matters: equipment and safety are included. That means you’re not arriving stressed about bringing the right straps, the right flotation, or the right level of confidence. If you’re looking for a “get out on the water” plan that doesn’t require a full day, this fits.
One more plus: the bay’s geography helps. The water has shallow flats that protect it from rougher conditions, which makes it more doable for beginners than open-ocean paddling.
You can also read our reviews of more tours and experiences in Miami


Price and value: what $19 really buys
The headline price is $19 per person for about one hour on the water. That’s genuinely good value for a rental with life jackets and safety gear included. The catch is the practical one: there’s also a remaining fee for tax/fees due at check-in.
So when you budget, think in totals, not just the base fare. Several people ran into surprise costs at the dock level, so I’d strongly recommend you treat the $19 as the starter price and expect an added amount at check-in.
Also note a payment detail that can matter at the last second: the operator states that cards without the full name printed aren’t accepted, and Amex/Apple Card/gift cards are not accepted by the company. Bring a card format you know will work, or you’ll be stuck doing paperwork while everyone else is gearing up.
And because the experience is non-refundable and cannot be changed for any reason, I only book this kind of activity when I’m okay with making it happen even if weather turns.
Choosing your ride: single kayak, double kayak, or stand-up paddleboard
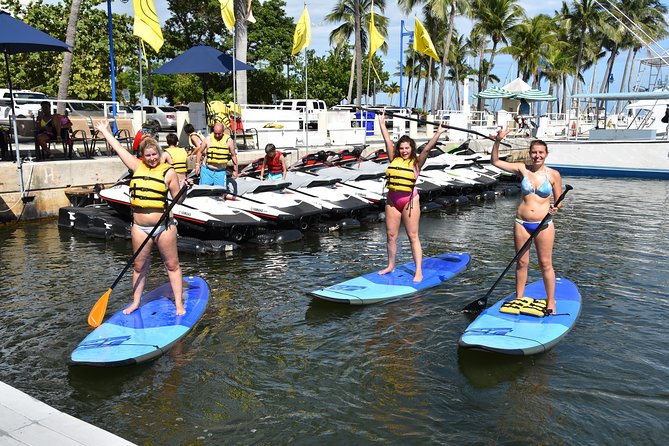
You can choose your craft, and that choice changes the whole feel of the hour.
Kayaks: easier stability, more control
Single kayaks are a good match if you want quiet, direct effort—especially if you’ve paddled before or you just like being hands-on. Double kayaks work well for couples or friends who want to paddle together, but you’ll want at least some coordination between the two of you.
If you’re new, a kayak can be the “confidence builder.” The body movement is familiar, and the kayak tends to feel predictable in calmer bay water.
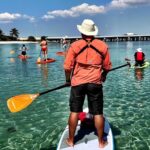
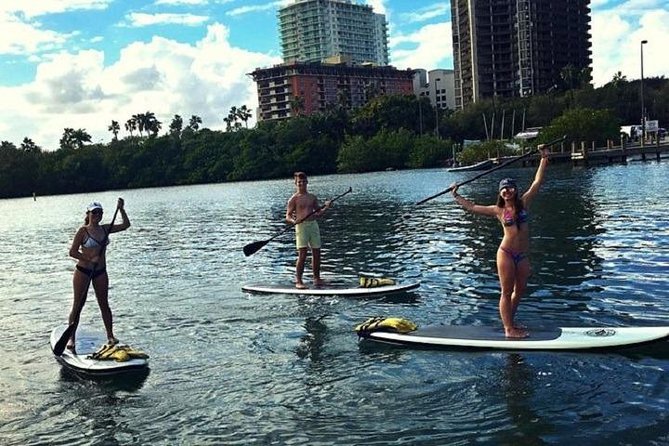
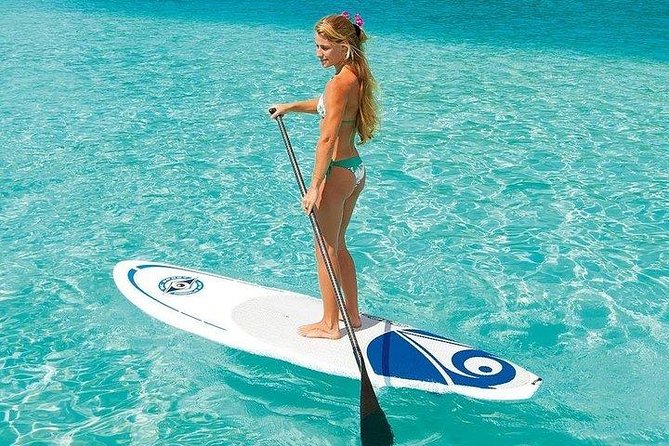
Paddleboards: fun, athletic, and very photo-friendly
Stand-up paddleboards are great if you want a more active workout and you like the wide-open view. Expect a learning curve—balance is the main skill. Even so, the operator provides a quick lesson on how to maneuver using a paddle before you head out.
If you choose paddleboard, pack patience. The first few minutes are about getting comfortable, then the scenery gets good.


Where you start (Key Biscayne) and how that shapes your experience
Your meeting point is 1 Rickenbacker Cswy, Key Biscayne. This matters because Key Biscayne is close to Miami Beach, but you’re getting a different kind of water—more sheltered, more likely to feel like a “nature break” than a city activity.
Parking is available next to the departure point, and public transportation is near enough to be an option if you’d rather not drive. The big practical thing here is arriving on time for check-in paperwork. You’ll need a valid government ID or passport, and you should plan to show up 15–20 minutes early.
This isn’t a sit-and-wait experience. It moves. You arrive, you do the paperwork, you get fitted with gear, you get a safety briefing, and then you go.
From safety briefing to the water: getting your bearings fast
Everyone starts the same way: life jacket and equipment, plus instructions so you know how to handle the paddle safely and control your direction. The operator emphasizes that guests can participate even if you’re a beginner—this is meant to be accessible.
In practice, the safety briefing does two jobs:
- It lowers the stress level so you don’t feel lost when you push off.
- It sets expectations for how to paddle back efficiently during your scheduled time.
If you happen to get an instructor like Troy, you may get a briefing that’s both informative and a bit funny—helpful when you’re trying to absorb safety rules without falling into boring lecture mode.
Paddling your own route in Biscayne Bay National Park (without getting stuck)
The biggest feature here is also the easiest to misunderstand: there’s no fixed route. You plan your own itinerary along Biscayne Bay National Park and head out from the launch point, then make sure you return by the end of your time window.
Here’s how I’d think about it so the hour feels satisfying instead of short:
- Keep your first leg oriented so you can paddle back comfortably.
- Give yourself room to explore without racing the clock.
- If you notice wind building, adjust your plan rather than pushing forward.
A specific tip you should follow: it’s recommended to go against the wind direction for the first half, because it can be much easier to paddle back afterward. That’s backwards from how a lot of people instinctively plan, so treat it as a real time-saver.
What you might see along the way
This part isn’t guaranteed, but it’s a big reason people book. The area around Biscayne Bay is known for marine life, and the operator highlights sightings like:
- dolphins
- sea turtles
- manatees
On top of that, one paddler noted seeing an alligator and a crane. Those sightings are not something I’d promise, but they’re a clue about the wider wildlife potential around the bay edges.
As you paddle, don’t only stare ahead. Look slightly off to the sides where animals often surface or move along the shallows. And slow down for a few seconds whenever you spot something—wildlife is easier to catch when you stop rushing your breathing.
The “shore-hugging” reality
Because this is a self-guided paddle within a shared bay area, you should expect some limitations. One reviewer specifically pointed out that the main area to paddle can be close to shore and populated with other people in the water, so be mindful with your spacing and avoid getting too confident about where you can go.
If you want long, empty stretches, this probably won’t feel like that. If you want short paddling loops with frequent scenery and wildlife possibilities, it’s a great fit.
A practical mini-itinerary for your 1-hour session
Even though it’s self-guided, your hour still has a natural rhythm. Here’s a realistic flow you can picture:
Step 1: Check-in and paperwork
You’ll arrive, show your government ID or passport, and complete any required paperwork. This is also when you may handle the extra fee for tax/fees.
Step 2: Fit-up and safety briefing
Expect a life jacket fitting and quick instruction on paddling basics. If you’re brand-new, don’t skip this. Ask one question if something feels unclear, especially about turning and how to keep your craft under control.
Step 3: Push off and find your pace
Once you’re on the water, start by paddling in a straight line and checking how you’re moving. If you’re on a paddleboard, give yourself a few minutes to settle your balance before you turn toward sightseeing.
Step 4: Your wildlife-and-scenery plan
Now you’re free. Pick a direction, then adjust based on wind and your comfort level. If there’s a small beachable area, a reviewer mentioned a nice little island spot where they could beach the kayaks—so if the conditions allow it, you might find your own short stop for photos or a quick stretch.
Step 5: Head back with time in mind
Return on schedule. Don’t wait until the last five minutes to start paddling back, because wind can change and your effort might not match what you planned in your head.
What it’s like in real life: group size, staff, and comfort
This is capped at 10 travelers, so you’re not dealing with a chaotic line of people all trying to shove in at once. That matters because paddling is time-based. Less crowding means more straightforward check-in and less waiting at the water’s edge.
Staff support also shows up in the feedback. People repeatedly describe the team as friendly and helpful, and at least one person praised how quickly they were brought out with their kayak. That quick ramp-up is a big deal when you’re paying for a short session—you want to spend the hour outside, not stuck in logistics.
What to bring and wear: don’t paddle unprepared
You’ll get wet. That’s not a joke. Plan as if your shoes and clothes may not survive the experience in perfect shape.
What to wear:
- swimsuit
- sunglasses and sunscreen
- a hat
- quick-dry or old clothes you don’t mind getting salty/wet
Bring:
- a change of clothes
- beach towel
- hair tie if you have long hair
Optional add-ons you might see offered during check-in include a waterproof phone case. Even if you don’t buy it, consider leaving valuables in a secure bag on land.
Also important: you must understand English for the safety instructions.
For dogs: service animals are allowed, and dogs are allowed if they’re well behaved and won’t damage equipment. Life jackets for dogs are not provided, so if you’re bringing a pet, you should plan accordingly.
Weather, rain, and how to protect your money
Miami weather can be unpredictable. One major disappointment involved arriving in pouring rain and being unable to complete the activity. The operator response is practical: summer rain can swing quickly, and they may wait for a window to go out.
Start times can be delayed or even canceled due to weather. If that happens, you’ll receive a voucher to reschedule. But if you cancel yourself, the experience is non-refundable.
So my advice is simple: book when you have flexibility, and don’t schedule this as the one activity holding your whole trip together. If the day looks stormy, you might still get a paddling window, but you should assume you could end up rescheduling.
Who should book this paddle time?
This experience is best for:
- beginners who want water time without heavy gear
- couples or friends who want to choose their own route
- people who enjoy wildlife sightings and want a calm, sheltered bay paddle
- anyone who wants a short activity that fits between beach plans
It’s less ideal if:
- you need guaranteed wildlife sightings or a dramatic, far-off destination (this is closer-to-shore exploration for many routes)
- you absolutely cannot handle possible delays from rain
- you’re trying to keep the trip strictly to the $19 base price, because extra tax/fees can apply at check-in
Should you book Paddle Sports with Miami Watersports?
I’d book it if you want a straightforward way to experience Biscayne Bay from the water and you’re comfortable with the self-guided part. The combination of gear included, a calm setting, and small-group energy makes it a strong value for a one-hour outing.
Before you go, do three things:
- Plan your budget with the extra tax/fee amount at check-in in mind.
- Bring a card that will work for their payment rules.
- Have a weather plan in your head, because rain can change everything fast.
If you like to steer your own pace, keep an eye out for wildlife, and don’t mind that your route is yours to choose, this paddle session is a smart Miami add-on.